Looking for a quick, no-bake treat that’s both simple and delicious? You’ve found it! My No-Bake Peanut Butter Bars come together in minutes and need no oven at all. They pack in rich peanut butter flavor, a touch of sweetness, and delightful textures, making them perfect for snack time or dessert. Get ready to learn how to whip up these tasty bars with easy ingredients and even easier steps!
Why I Love This Recipe
- Quick and Easy Preparation: This recipe takes just 10 minutes to prepare, making it perfect for busy days or last-minute snacks.
- Healthy Ingredients: Made with natural peanut butter and rolled oats, these bars are a nutritious option that satisfies sweet cravings without guilt.
- Customizable: You can easily modify this recipe to suit your taste by adding nuts, seeds, or swapping out the sweetener.
- Perfect for Meal Prep: These bars can be made ahead of time and stored in the fridge, making them a convenient grab-and-go snack.
Ingredients
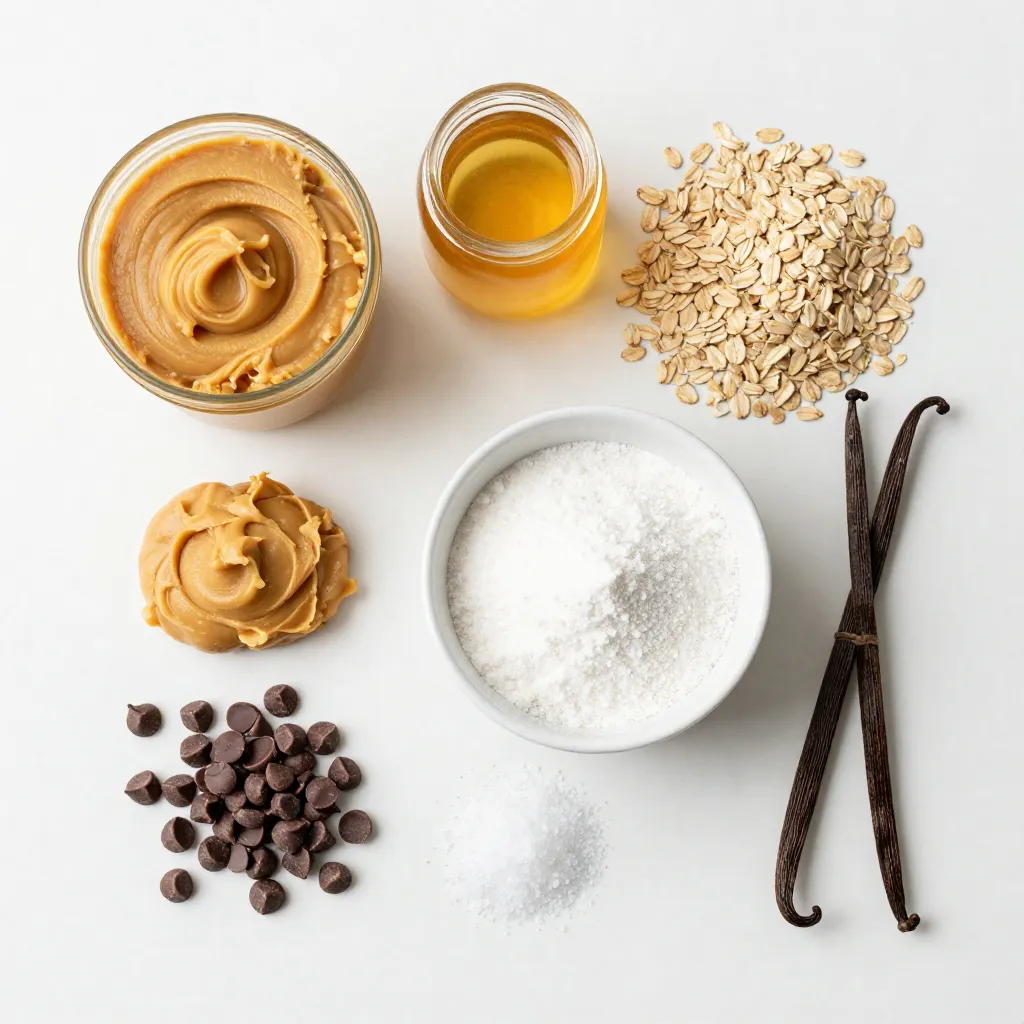
List of Ingredients
– 1 cup natural peanut butter
– 1/2 cup honey or maple syrup
– 1 3/4 cups rolled oats
– 1/2 cup powdered sugar
– 1/4 cup chocolate chips
– 1/4 teaspoon salt
– Optional: 1/2 teaspoon vanilla extract
These ingredients come together to create a sweet, tasty treat. I love using natural peanut butter because it adds a rich flavor. Honey or maple syrup gives the bars a nice sweetness.
Old-fashioned rolled oats provide great texture and chew. Powdered sugar helps bind the mix and adds a little more sweetness. Chocolate chips bring a delightful burst of flavor. A pinch of salt balances the sweetness perfectly.
If you want, you can add vanilla extract for an extra layer of taste. You can also mix in nuts or seeds for crunch. These options let you customize the bars to your liking.
This simple list makes it easy to get started. You’ll find these ingredients in most kitchens, so you can whip them up anytime!
Step-by-Step Instructions
Mixing the Base
1. Start by taking a medium bowl. Add 1 cup of natural peanut butter and 1/2 cup of honey or maple syrup. Mix these well with a spatula until smooth.
2. Next, add 1 3/4 cups of rolled oats, 1/2 cup of powdered sugar, and 1/4 teaspoon of salt. If you want, add 1/2 teaspoon of vanilla extract for more flavor. Stir everything together until it forms a sticky dough.
Forming the Bars
1. Now, gently fold in 1/4 cup of chocolate chips. Make sure they are evenly spread in the mixture.
2. Grab an 8×8 inch square baking dish. Line it with parchment paper, leaving an inch overhang on two sides. This will help you lift the bars out later.
3. Transfer the peanut butter mixture into the dish. Press it down firmly with a spatula or your hands. Make sure it’s flat and even.
Chilling and Cutting
1. Place the dish in the refrigerator. Chill for at least 2 hours. This will help the bars set and become firm.
2. After chilling, lift the bars out using the parchment paper. Place them on a cutting board.
3. Cut the mixture into squares or bars, depending on how you like them. Enjoy your treats!
Tips & Tricks
Achieving the Perfect Texture
To get the right texture in your no-bake peanut butter bars, you need to choose the right peanut butter. Creamy peanut butter gives a smooth, soft bar. Crunchy peanut butter adds fun bites of peanuts. Use what you like best.
Using old-fashioned rolled oats is key. They soak up moisture well and hold everything together. Quick oats might make the bars too mushy.
Adjust the sweetness to fit your taste. If you want a sweeter bar, add more honey or maple syrup. If you prefer less sweetness, cut back on it. You control the flavor!
Enhancing Flavor
You can make your bars even tastier with different types of chocolate. Dark chocolate offers a rich taste, while semi-sweet chocolate keeps it classic.
Consider adding mix-ins too! Nuts, seeds, or dried fruit can give your bars extra crunch and flavor. Don’t be afraid to get creative!
Want a special twist? Add flavor extracts like vanilla or almond. Just a little can change the whole taste.
Troubleshooting Common Issues
Sometimes, your bars might not hold together. This can happen if there’s too much moisture. Try adding more oats to fix this.
If the mixture is too sweet, you can balance it with a pinch of salt. This can help cut the sweetness and make the flavors pop.
For different dietary needs, you can swap ingredients. Use almond butter for nut-free bars. You can use maple syrup to keep it vegan. Simple changes can make your bars fit for everyone!
Pro Tips
- Choose the Right Peanut Butter: Opt for natural peanut butter without added sugars or oils for a healthier option and a more authentic peanut flavor.
- Customize Your Sweetness: Adjust the amount of honey or maple syrup based on your sweetness preference; you can even reduce it for a less sweet treat.
- Chill for Best Results: Allow the bars to chill for longer than 2 hours if they are not firm enough; this will ensure they hold their shape when cut.
- Experiment with Mix-Ins: Feel free to add dried fruits, seeds, or different types of chocolate chips to personalize your bars and add extra nutrition.
Variations
Flavor Variations
You can switch up the flavors of these bars in fun ways. Here are some options to try:
– Chocolate peanut butter bars: Add more chocolate chips or melted chocolate to the mix. This gives a rich, sweet treat.
– Peanut butter and jelly bars: Spread your favorite jelly on top before chilling. This adds a fruity twist and makes them fun!
– Adding spices like cinnamon or nutmeg: A pinch of these spices can make your bars warm and cozy. Just a little goes a long way!
Dietary Variations
You can easily adjust the recipe to suit different diets. Here are some ideas:
– Gluten-free adaptations: Use gluten-free oats instead of regular ones. This keeps the bars safe for those who can’t eat gluten.
– Vegan options: Swap honey for maple syrup. This makes the bars vegan-friendly and just as tasty.
– Low-sugar alternatives: Use less powdered sugar or choose a sugar substitute. This helps if you want to cut down on sugar.
Seasonal Twists
Try adding seasonal ingredients to keep things fresh. Here are some ideas:
– Incorporating seasonal ingredients: In fall, you can add pumpkin puree for a fun flavor. In summer, shredded coconut can give a tropical vibe.
– Festive toppings for holidays: For the holidays, sprinkle crushed candy canes or colorful sprinkles on top. This makes your bars festive and fun!
Storage Info
Proper Storage Methods
To keep your no-bake peanut butter bars fresh, store them in the fridge. This helps maintain their shape and flavor. Wrap the bars in plastic wrap or place them in an airtight container. For longer storage, you can freeze the bars. Just make sure they are tightly wrapped to avoid freezer burn.
Best Containers for Storage
Use airtight containers made of glass or plastic. These containers keep moisture out. If you prefer, you can wrap individual bars in plastic wrap for easy grab-and-go snacks. This method also helps prevent them from sticking together.
How Long Do They Last?
In the fridge, these bars last about one week. If you freeze them, they can stay good for up to three months. Just remember to label the container with the date. This way, you always know when they were made. Enjoy your tasty treat anytime!
FAQs
Can I make these bars nut-free?
Yes, you can make these bars nut-free. Use sun butter or soy nut butter instead of peanut butter. These options still give you creaminess and flavor without nuts. When choosing a nut-free option, check for any allergies in your group.
How can I adjust the sweetness of the recipe?
To adjust sweetness, reduce the honey or maple syrup. You can cut the amount by a third or half. This change will make the bars less sweet. You can also try adding mashed bananas or unsweetened applesauce for a natural sweet taste.
What can I substitute for oats?
If you want to substitute oats, try using quinoa flakes or almond flour. These options work well and keep the bars together. You can also use crushed rice cereal for a crunchy texture. Just make sure whatever you use can bind the mixture.
Are these bars suitable for kids?
Yes, these bars are very suitable for kids. They have protein from peanut butter, fiber from oats, and sweetness from honey. They make a great snack for after school or sports. You can also cut them into fun shapes to make them more appealing!
Making peanut butter bars is simple and fun. You need just a few ingredients, like natural peanut butter, honey, and rolled oats. Follow the step-by-step guide to mix, form, and chill your bars. Use tips to get the best texture and flavor. Try different variations for fun twists. Store them properly to keep them fresh.
In the end, enjoy these tasty treats anytime. They are easy to make and can fit any diet. Get creative, and make them your wa