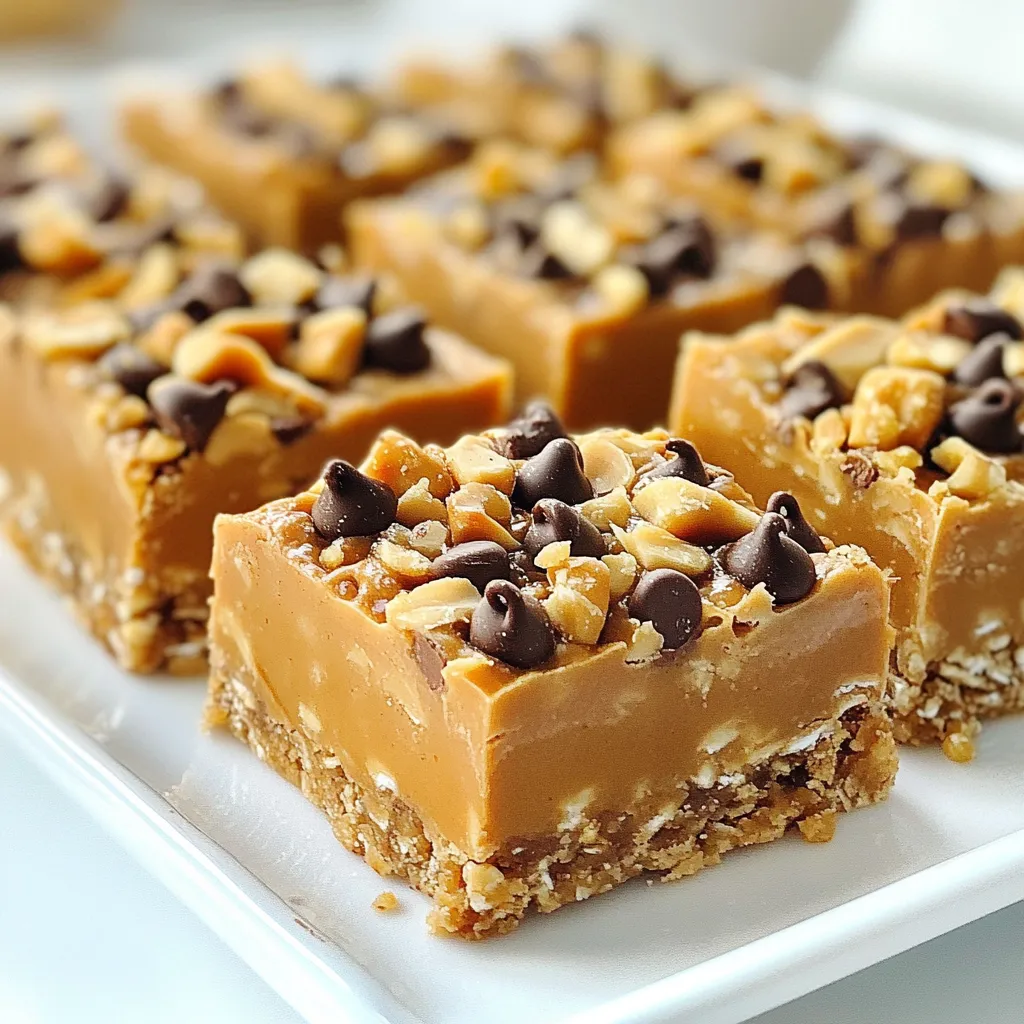
Craving a sweet treat that’s quick and easy? These No-Bake Peanut Butter Bars are just the answer! With simple ingredients like creamy peanut butter, rolled oats, and chocolate chips, you’ll whip up this delicious snack in no time. Whether you’re busy or just want a yummy dessert, this recipe is a must-try. Let me guide you through making the perfect bars that everyone will love!
Why I Love This Recipe
- Quick and Easy: This recipe requires no baking, making it a fast and convenient option for a delicious treat.
- Nutritious Ingredients: With wholesome ingredients like oats and almond flour, these bars offer a satisfying and healthy snack.
- Customizable: You can easily adjust the recipe by adding your favorite nuts or using different sweeteners to suit your taste.
- Perfect for Meal Prep: These bars store well in the fridge, making them an ideal option for meal prep and on-the-go snacking.
Ingredients
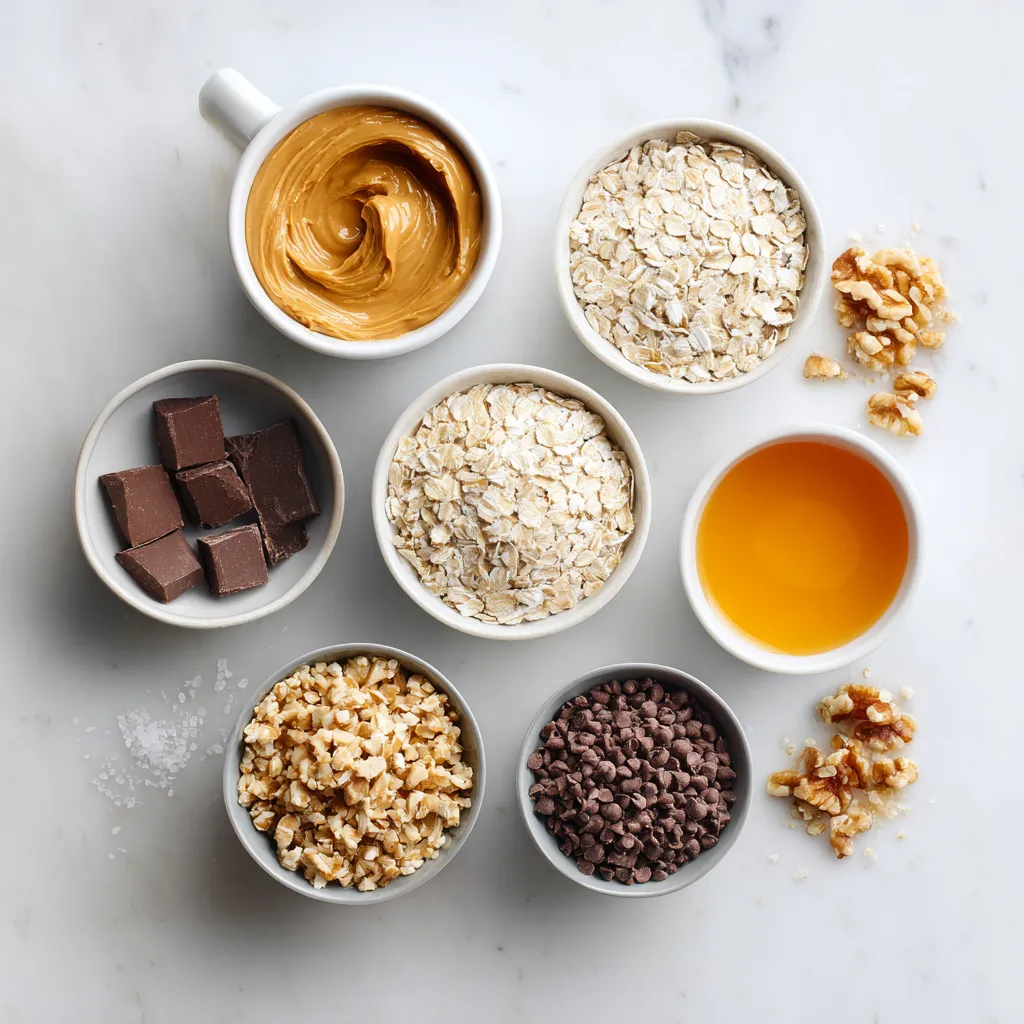
Essential ingredients for No-Bake Peanut Butter Bars
– 1 cup creamy peanut butter
– 1/2 cup honey or maple syrup
– 2 cups rolled oats
– 1/2 cup almond flour
– 1/2 cup dark chocolate chips
– 1/4 teaspoon salt
– 1 teaspoon vanilla extract
– Optional: 1/4 cup chopped nuts
To make these tasty bars, you need simple ingredients. Creamy peanut butter gives them their rich flavor. Honey or maple syrup adds sweetness. Use rolled oats for a chewy texture and almond flour for a nutty base. Dark chocolate chips offer a sweet finish, while salt balances all the flavors. Vanilla extract enhances the taste. If you want a crunch, add chopped nuts like almonds or walnuts.
These ingredients are easy to find. Most stores carry them. You can even swap honey for maple syrup based on your taste. The bars are quick to make. With just a few steps, you’ll have a delicious treat ready to chill.
Step-by-Step Instructions
Preparing the Peanut Butter Mixture
1. Start by melting the creamy peanut butter and honey together.
2. Use a medium saucepan on low heat.
3. Stir continuously until the mixture is smooth and creamy.
4. Remove from heat and add the vanilla extract and salt.
5. Mix well to blend all the flavors together.
Combining Dry Ingredients
1. In a large bowl, combine the rolled oats and almond flour.
2. Stir them together until they are well mixed.
3. Make sure there are no clumps in the dry mix.
Forming the Bars
1. Pour the warm peanut butter mixture over the dry ingredients.
2. Mix thoroughly until everything is well coated.
3. If you want, fold in the dark chocolate chips and chopped nuts.
4. Prepare an 8×8 inch baking dish by lining it with parchment paper.
5. Leave some paper hanging over the edges for easy removal later.
6. Transfer the mixture into the dish.
7. Use a spatula or your hands to press it down firmly.
8. Make sure it is evenly spread and compacted.
9. Place the dish in the refrigerator for at least 1 hour to set.
10. Once firm, lift the bars out using the parchment edges.
11. Cut them into squares or rectangles.
12. Store leftovers in an airtight container in the fridge.
Tips & Tricks
Common mistakes to avoid
– Overheating the peanut butter mixture: Heat the peanut butter and honey gently. If it gets too hot, the bars might not set well.
– Not pressing the mixture firmly: Use your hands or a spatula to press down hard. This step is key for a sturdy bar.
How to achieve the best texture
– Tips for compacting the bars: After mixing, pack the mixture tightly in the baking dish. This ensures every bite holds together.
– Suggestions for variations: You can swap almond flour for oats or use different nut butters. Play around for new tastes!
Enhancing flavor and presentation
– Drizzling melted chocolate: Melt some dark chocolate and drizzle it over the bars before they set. This adds a sweet touch.
– Adding toppings before setting: Sprinkle chopped nuts or coconut flakes on top. This not only looks great but adds crunch too.
Pro Tips
- Use Natural Ingredients: Opt for organic peanut butter and pure maple syrup to enhance the flavor and health benefits of your bars.
- Chill Thoroughly: Make sure to refrigerate the bars for a full hour to ensure they set properly and maintain their shape when cut.
- Customize Your Mix-ins: Feel free to add other ingredients like dried fruits, seeds, or coconut flakes for added flavor and texture.
- Perfect Storage: Store the bars in an airtight container in the fridge to maintain freshness and prevent them from becoming too soft.
Variations
Flavor variations
You can switch up flavors by using different nut butters. Almond butter or cashew butter works great. Each choice gives a new taste. You can also try sweeteners like agave or coconut sugar. They add unique sweetness to your bars.
Add-ins for extra crunch
For extra crunch, consider adding more nuts or seeds. Chopped almonds, walnuts, or pumpkin seeds are all good options. You can also mix in dried fruits. Raisins or cranberries give a sweet and chewy texture.
Dietary modifications
If you need gluten-free bars, use certified gluten-free oats. This keeps your recipe safe for a gluten-free diet. For vegan options, substitute honey with maple syrup. Both choices keep your bars delicious while meeting dietary needs.
Storage Info
How to store No-Bake Peanut Butter Bars
To keep your bars fresh, use an airtight container. This prevents moisture and keeps them tasty. Line the container with parchment paper for easy removal. Place the bars in a single layer if you can. If not, separate layers with parchment to avoid sticking.
Shelf life
These bars last about one week in the refrigerator. You will know they are spoiled if they smell off or have a change in texture. Always check for any mold or odd colors before eating.
Freezing options
To freeze leftover bars, wrap them tightly in plastic wrap, then place them in a freezer bag. This keeps out air and prevents freezer burn. For thawing, move the bars to the fridge overnight. You can serve them cold or let them sit at room temperature for a bit.
FAQs
Can I make No-Bake Peanut Butter Bars ahead of time?
Yes, you can make these bars ahead of time. They store well in the fridge. I often prepare them the night before a gathering. Just keep them in an airtight container. They taste great after chilling for a few hours.
What can I substitute for almond flour?
If you need a substitute for almond flour, try oat flour or coconut flour. Both work well in this recipe. Just keep in mind that the texture might change slightly. Oat flour gives a nice flavor and is easy to make at home.
Are these bars gluten-free?
Yes, these bars are gluten-free if you use gluten-free oats. Be sure to check the label on your oats. Most rolled oats are gluten-free, but some can be processed in facilities with gluten. Always look for certified gluten-free oats to be safe.
How do I know when the bars are set properly?
The bars are set when they feel firm to the touch. After one hour in the fridge, they should hold their shape. If they still feel soft, give them a bit more time. You can also stick a toothpick in the center; if it comes out clean, they are ready.
Can I make these bars nut-free?
Yes, you can make these bars nut-free. Use sun butter or soy nut butter instead of peanut butter. These alternatives provide a similar texture and flavor. Just ensure that your chocolate chips are also nut-free if you add them.
No-Bake Peanut Butter Bars are simple and fun to make. We’ve covered essential ingredients like creamy peanut butter, rolled oats, and dark chocolate chips. You learned step-by-step instructions, tips to avoid mistakes, and how to store your bars for freshness. Enjoy experimenting with variations to suit your taste. Remember, these bars are a healthy treat that can fit into many diets. Try them today, and you’ll enjoy a delicious snack that’s easy to make and shar