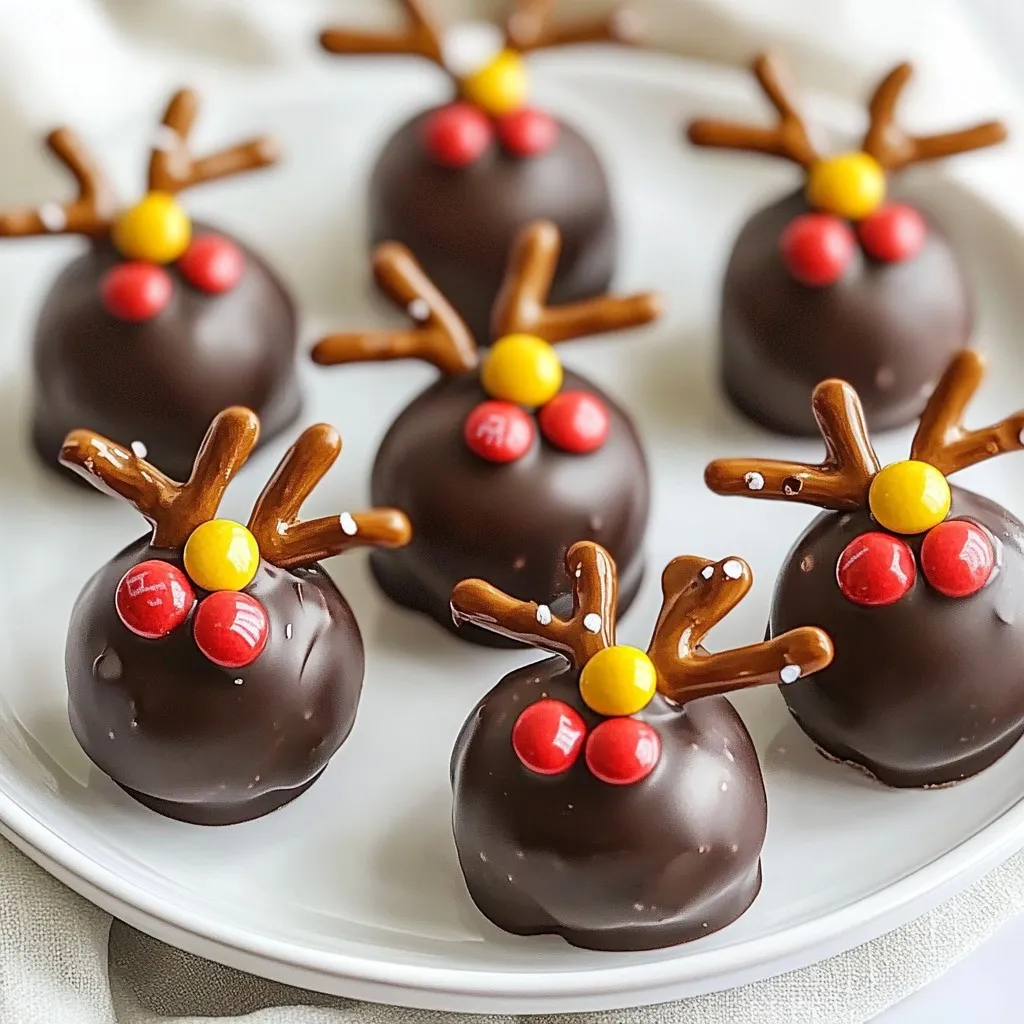
Get ready to bring some cheer to your kitchen this holiday season with my No-Bake Christmas Reindeer Treats! These fun, easy-to-make treats will delight kids and adults alike. No ovens needed, just a bit of mixing and decorating. Whether you’re prepping for a party or a cozy family night, these festive snacks will make your celebration merry. Let’s dive into the ingredients and create some holiday magic together!
Why I Love This Recipe
- Easy to Make: This no-bake recipe is simple and quick, perfect for involving kids or for a last-minute holiday treat.
- Festive Presentation: These treats look adorable and are sure to be a hit at any holiday gathering, adding fun to your dessert table.
- Delicious Combination: The mix of chocolate, peanut butter, and sweet toppings creates a delectable flavor that everyone loves.
- Customizable: Feel free to get creative with the decorations or try different candies for unique variations of the reindeer treats.
Ingredients
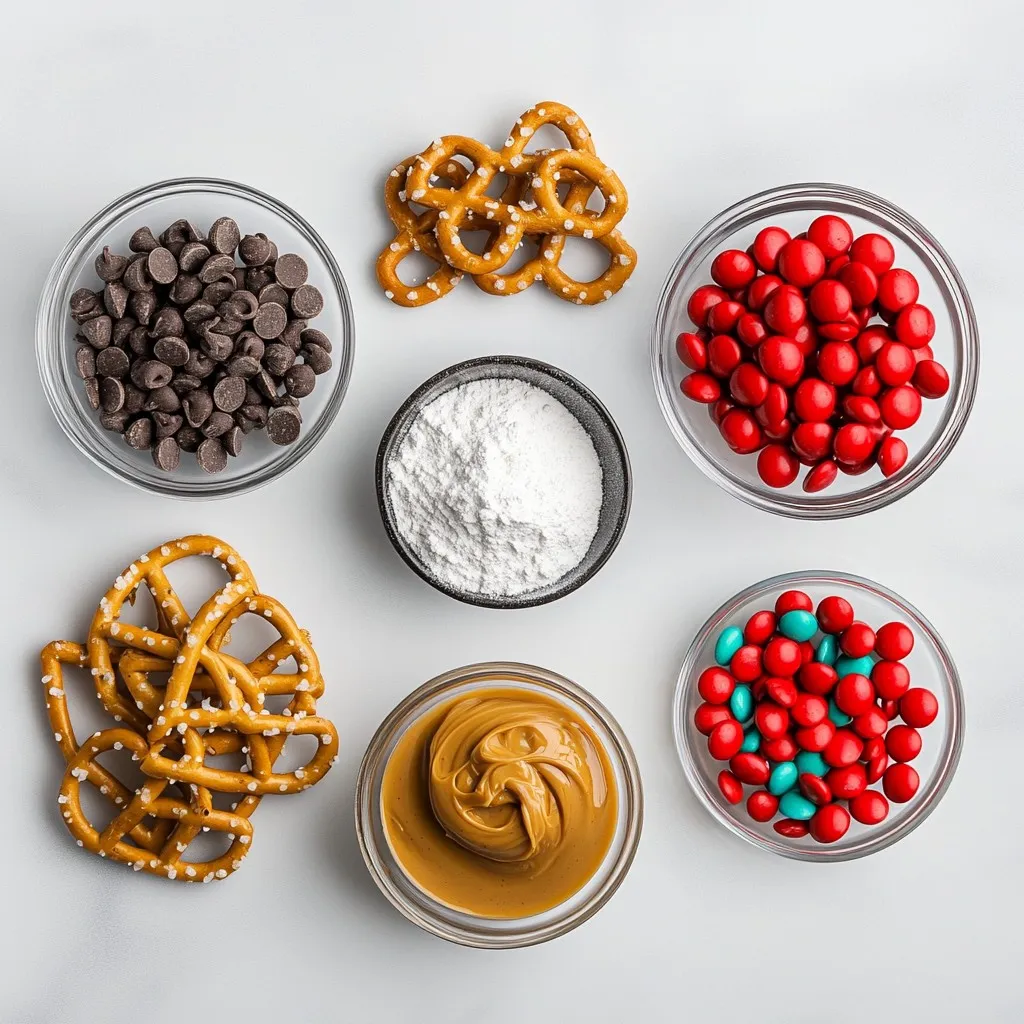
List of Ingredients
To make No-Bake Christmas Reindeer Treats, you need:
– 2 cups chocolate sandwich cookies, finely crushed
– 1 cup creamy peanut butter
– ½ cup powdered sugar
– 1 cup chocolate chips (for melting)
– 16 pretzel twists (for antlers)
– 16 candy eyes
– 16 red M&M’s (for noses)
– 1 tablespoon vegetable oil (for melting chocolate)
Measurement Conversions
If you need to convert measurements, here’s a quick guide:
– 1 cup = 8 fluid ounces
– ½ cup = 4 fluid ounces
– 2 cups = 16 fluid ounces
– 1 tablespoon = 3 teaspoons
Alternative Ingredients
You can swap some ingredients based on your taste:
– Use almond butter instead of peanut butter for a nutty twist.
– Try using gluten-free cookies for a gluten-free option.
– Dark chocolate chips work well if you prefer a richer taste.
– Mini pretzels can replace pretzel twists for a different look.
These options allow you to customize your treats while keeping the fun and festive spirit alive!
Step-by-Step Instructions
Preparation Overview
Start by gathering all your ingredients. You will need chocolate sandwich cookies, peanut butter, and powdered sugar. Also, have your chocolate chips, pretzels, candy eyes, red M&Ms, and vegetable oil ready. This will help keep things organized.
Mixing the Dough
In a large mixing bowl, combine the crushed chocolate sandwich cookies, peanut butter, and powdered sugar. Use a spatula or your hands to mix until it forms a dough. It should feel sticky but hold together well. Once mixed, scoop out a tablespoon of the dough. Roll it into a ball about 1-inch wide. Repeat this until you shape all the dough into 16 balls.
Chilling and Coating
Place the cookie balls on a baking sheet lined with parchment paper. Chill them in the fridge for about 30 minutes. This helps them firm up. While they chill, melt the chocolate. In a microwave-safe bowl, mix chocolate chips and vegetable oil. Microwave for 30 seconds at a time, stirring after each interval. Once smooth, remove the cookie balls from the fridge. Dip each ball into the melted chocolate, ensuring it is fully coated. Then, place them back on the parchment paper. Quickly add pretzel twists for antlers before the chocolate hardens. Press two candy eyes and a red M&M on each ball for faces. Let the chocolate set at room temperature or chill briefly to firm up.
Tips & Tricks
Perfecting the Chocolate Coating
To get a smooth chocolate coat, use good quality chocolate chips. I mix in a bit of vegetable oil. This keeps the chocolate shiny and easy to spread. Melt the chips in short bursts in the microwave. Stir often to avoid burning. After dipping, let excess chocolate drip off before setting the treats down.
Decorating Techniques
When you place the pretzel twists, do it while the chocolate is still wet. This helps them stick well. For the eyes and noses, use a gentle push. It helps them stay in place. You can use mini chocolate chips if you can’t find candy eyes. The red M&M adds a nice pop of color.
Serving Suggestions
These reindeer treats look great on a festive platter. You can add sprinkles for extra flair. Try using green and red sprinkles to match the holiday theme. These treats are perfect for parties or as gifts. Just pack them in a cute box. They will brighten anyone’s day!
Pro Tips
- Chill for Better Coating: Make sure to chill the cookie balls for at least 30 minutes. This helps them hold their shape better when you dip them in chocolate.
- Choose Quality Chocolate: Use high-quality chocolate chips for melting to ensure a smooth and delicious coating.
- Customize Your Antlers: Get creative with your antlers! You can use different types of pretzels or even chocolate-covered pretzels for a fun twist.
- Let the Chocolate Set: Allow the chocolate to set at room temperature for the best texture. If you’re in a hurry, you can place them in the fridge for a quick firming process.
Variations
Flavor Variations
You can change the flavor of these treats easily. Try using vanilla cookies for a lighter taste. You can also swap peanut butter for almond butter. This gives a nutty twist that pairs well with chocolate. For a minty version, add mint extract to the melted chocolate. Just a few drops will do!
Dietary Substitutes
If you have allergies, there are great swaps. Use sunflower seed butter instead of peanut butter for nut-free treats. For a gluten-free option, choose gluten-free cookies. You can find many brands that taste just as good. If you want a vegan treat, use dairy-free chocolate chips and nut butter.
Creative Decoration Ideas
Make your reindeer treats even more fun with decorations. Use mini marshmallows instead of candy eyes for a fluffy look. You can also add colorful sprinkles for a festive touch. Try using different colored M&M’s for a unique nose. Let your kids help with the decorating. It’s a fun way to celebrate the season!
Storage Info
Best Storage Practices
To keep your No-Bake Christmas Reindeer Treats fresh, store them in an airtight container. This will help them stay moist and tasty. I like to use a container that is not too big. It helps prevent the treats from moving around and getting damaged.
Shelf Life
When stored properly, these treats last about five days at room temperature. If you keep them in the fridge, they can last up to two weeks. Just make sure to check for any changes in texture or smell before eating.
Freezing Instructions
You can freeze these treats for longer storage. Simply place them in a single layer on a baking sheet and freeze for about an hour. Once firm, transfer them to an airtight container or freezer bag. They will keep well for up to three months. To enjoy, thaw them in the fridge overnight before serving.
FAQs
Can I make these treats in advance?
Yes, you can make these treats in advance. They stay fresh in the fridge for up to a week. Just store them in an airtight container. If you want to freeze them, wrap each treat in plastic wrap. Then, place them in a freezer bag. They can last for up to three months in the freezer. Just let them thaw in the fridge before serving.
How can I adjust the recipe for different servings?
To adjust the recipe for different servings, you can easily scale the ingredients. For example, if you want to make 8 treats instead of 16, just halve each ingredient. If you need 32 treats, double the amounts. Keep the ratios the same for the best results. Remember, each treat should still be about 1 inch in size.
What can I use instead of peanut butter?
If you need a peanut butter alternative, try using almond butter or sun butter. Both options provide a similar texture and flavor. Nut-free options are great for people with allergies. You can also use chocolate hazelnut spread, but that will change the taste a bit. Just make sure any substitute is smooth for easy mixing.
This blog post covered everything you need to know about making delicious treats. We looked at key ingredients, step-by-step instructions, and helpful tips. I shared ways to add your own spin with flavor and decoration options. Plus, we discussed storage to keep your treats fresh.
Remember, cooking is fun! Experiment and enjoy the process. Whether you follow the recipe exactly or make it your own, have fun in the kitche