Are you ready to whip up a dish that’s both easy and full of flavor? Crispy Chicken Katsu Bowls are a delicious way to enjoy a classic meal at home. With crunchy chicken, fresh veggies, and a variety of sauces, you can customize your bowl to suit your taste. In this post, I’ll guide you step-by-step so you can create your own mouthwatering Chicken Katsu Bowls that everyone will love!
Why I Love This Recipe
- Deliciously Crispy: This chicken katsu is perfectly golden and crispy, delivering a satisfying crunch with every bite.
- Customizable Ingredients: You can easily modify the toppings and sides to suit your taste, making it a versatile meal option.
- Quick and Easy: With a total prep and cooking time of just 30 minutes, this recipe is perfect for a weeknight dinner.
- Flavorful Sauce: The katsu sauce adds a sweet and tangy kick, elevating the dish and complementing the chicken beautifully.
Ingredients
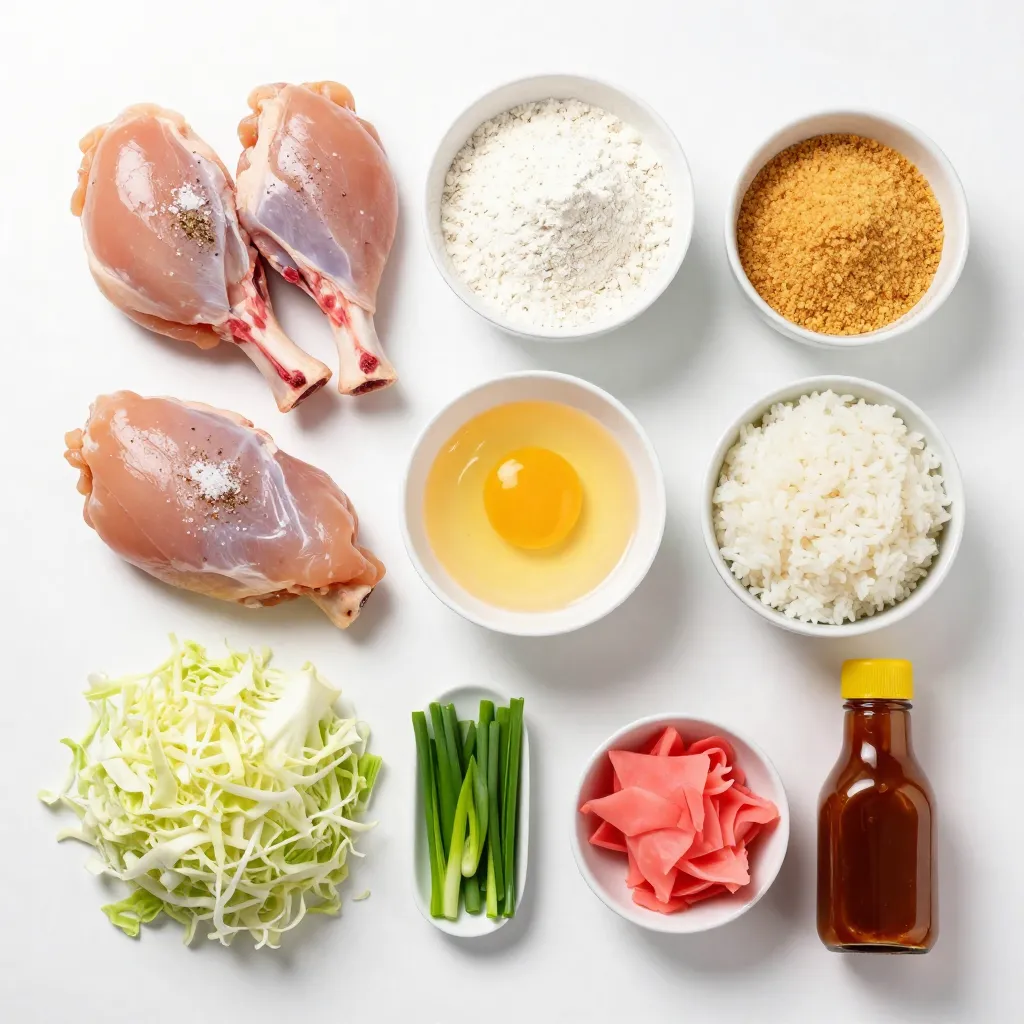
List of Ingredients
– 2 boneless, skinless chicken thighs
– Salt and freshly ground black pepper, to taste
– 1/2 cup all-purpose flour
– 1 large egg, beaten until frothy
– 1 cup panko breadcrumbs
– Vegetable oil, for frying
– 2 cups cooked Japanese short-grain rice
– 1 cup finely shredded cabbage
– 1/4 cup sliced green onions (scallions)
– 1/4 cup pickled ginger (for garnish)
– 1/4 cup katsu sauce (store-bought or homemade)
Measurement Tips
When measuring flour, spoon it into the cup and level it off. This gives you the right amount without packing it down. For sticky ingredients like honey, spray the measuring cup with cooking spray first. This makes it easier to pour out. Use a kitchen scale for precise measurements, especially for the chicken. It’s a foolproof way to ensure even cooking.
Quality Ingredient Recommendations
I recommend using fresh, high-quality chicken thighs for the best flavor. Look for organic or free-range options if possible. For the panko breadcrumbs, choose Japanese-style for extra crunch. They are lighter and crispier than regular breadcrumbs. Use fresh green onions and cabbage for a bright, crisp finish. Finally, try a good quality katsu sauce for rich flavor. It makes a big difference in taste!
Step-by-Step Instructions
Preparing the Chicken
Start with the chicken thighs. Place them between two sheets of plastic wrap. Use a meat mallet or rolling pin to pound the chicken. Aim for an even thickness of about 1/2 inch. This helps them cook evenly. Season both sides with salt and freshly ground black pepper. Don’t skip the seasoning; it adds great flavor.
Setting Up the Breading Station
Now, let’s set up the breading station. Grab three shallow dishes. Fill the first with all-purpose flour. In the second, add the beaten egg. In the last, put the panko breadcrumbs. Arrange them in this order: flour, egg, then panko. This setup makes breading easy and fast.
Frying the Chicken
Heat about 1/2 inch of vegetable oil in a large skillet. Get the oil hot, around 350°F (175°C). Carefully place each breaded chicken thigh into the hot oil. Fry for about 4-5 minutes on each side. Look for a golden brown color and a crispy texture. When done, transfer the chicken to a plate lined with paper towels. This helps drain excess oil.
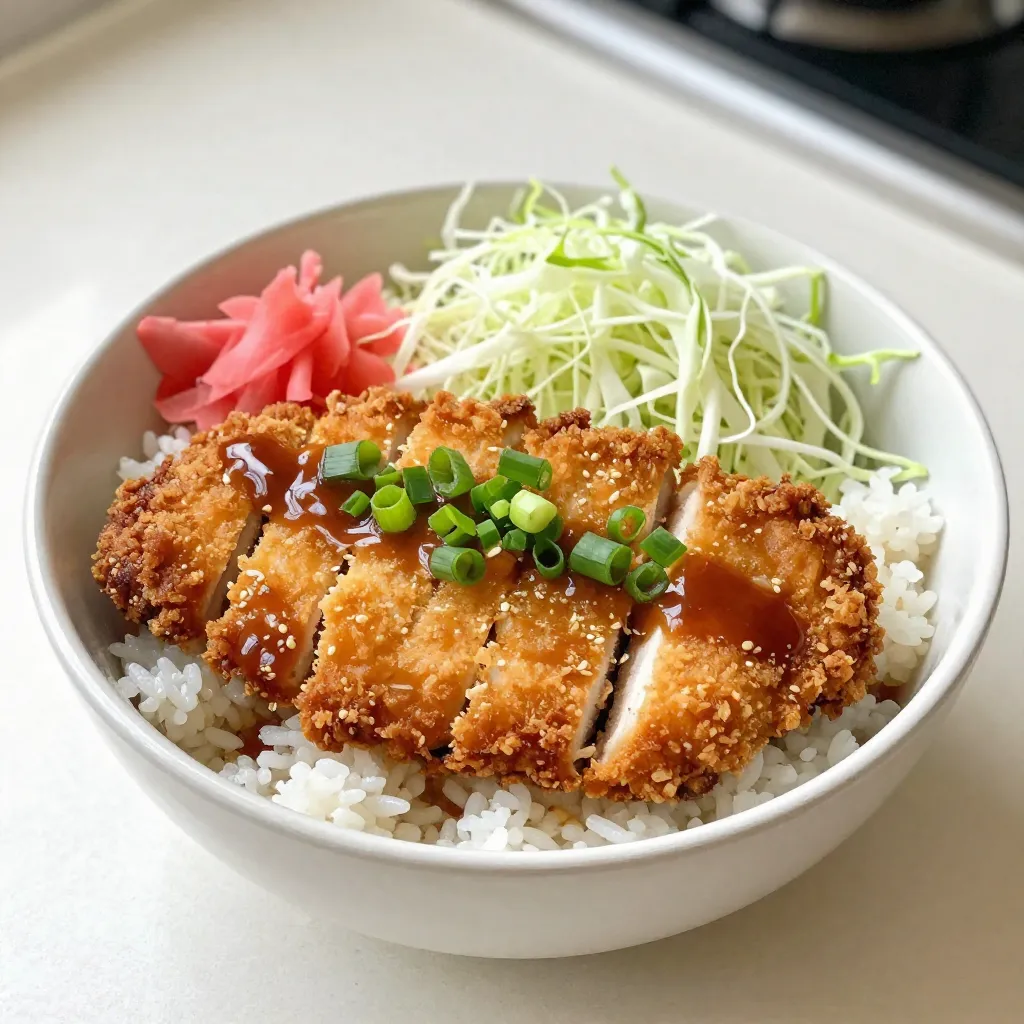
Assembling the Bowls
Take a serving bowl and add about 1 cup of cooked Japanese short-grain rice. This rice is sticky and perfect for this dish. Next, arrange the sliced crispy chicken on top. Add a generous handful of finely shredded cabbage. This adds crunch and freshness. Finally, sprinkle sliced green onions over everything for extra flavor.
Adding Finishing Touches
Drizzle a good amount of katsu sauce over the crispy chicken. This sauce gives a sweet and savory taste. Don’t forget to garnish each bowl with pickled ginger. This adds a beautiful color and a nice zing. For a fun presentation, serve the bowls with chopsticks or forks. Enjoy your meal!
Tips & Tricks
Achieving the Perfect Crispy Texture
To get that perfect crispy texture, start with panko breadcrumbs. They are lighter and crunchier than regular breadcrumbs. Make sure to press the panko firmly onto the chicken. This helps it stick better and adds more crunch. Fry the chicken in hot oil at around 350°F (175°C). This keeps the outside crispy while cooking the inside perfectly. If the oil is too cool, the chicken will absorb more oil and become soggy.
Common Mistakes to Avoid
Don’t skip seasoning the chicken. Salt and pepper enhance the flavor. Also, avoid overcrowding the pan when frying. If you cook too many pieces at once, the temperature drops. This leads to soggy chicken. Lastly, let the chicken rest before cutting. This helps keep the juices locked in, making every bite tender and juicy.
Serving and Plating Tips
For a beautiful presentation, layer the ingredients in the bowl. Start with rice, then add chicken, cabbage, and green onions. Drizzle katsu sauce over the chicken, and place pickled ginger on the side. Use chopsticks or a fork for a fun dining experience. For a special touch, drizzle more katsu sauce around the bowl’s edge. This not only adds flavor but also makes the dish look stunning.
Pro Tips
- Use Fresh Ingredients: Always opt for fresh chicken thighs and crisp vegetables to enhance the flavor and texture of your katsu bowls.
- Maintain Oil Temperature: Keep an eye on the oil temperature while frying. Too hot, and the chicken will burn; too cool, and it will be greasy. Use a thermometer for best results.
- Make Ahead: You can prepare the chicken and breading ahead of time. Store them separately in the fridge until you’re ready to fry for a quick meal.
- Customize Your Bowls: Feel free to add other toppings like avocado, radishes, or sesame seeds for more flavor and visual appeal.
Variations
Chicken Alternatives (Pork, Tofu, or Vegetables)
You can swap chicken for other tasty options. Pork cutlets work well and offer a different flavor. Tofu is great for a plant-based twist. Press the tofu to remove extra water. Then, slice it into pieces and follow the same breading steps. You can also use veggies like eggplant or zucchini. Slice them thin and bread them like the chicken. Each option brings its own unique taste to the bowl.
Different Katsu Sauces (Homemade vs. Store-Bought)
Katsu sauce is key to this dish. You can use store-bought sauce for speed and ease. It tastes good and saves time. However, making homemade sauce adds a personal touch. Mix ketchup, soy sauce, and a bit of sugar. Add a dash of Worcestershire sauce for depth. Homemade sauce can elevate your meal and impress guests. Feel free to adjust the flavors to suit your taste.
Bowl Customizations (Rice Options, Vegetables)
Rice is the base of the bowl, but you can switch it up. Use brown rice for a nutty flavor and added fiber. Quinoa is another great option, providing protein and texture. You can also add vegetables to the bowl. Try steamed broccoli, snap peas, or carrots. These add color and nutrients. Layer your bowl creatively to make it look inviting. Mix and match to find your perfect combination!
Storage Info
How to Store Leftovers
After enjoying your crispy chicken katsu bowls, you can store leftovers. Place the chicken and rice in an airtight container. Keep the cabbage and toppings separate. This way, they stay crisp. Store everything in the fridge for up to three days.
Reheating Instructions
To reheat your chicken katsu, use an oven or air fryer. Preheat your oven to 350°F (175°C). Place the chicken on a baking sheet. Heat for about 10-15 minutes. This keeps the chicken crispy. You can also use a microwave, but the chicken may get soggy. If using a microwave, heat in short bursts. Check the chicken often.
Freezing Tips for Meal Prep
If you want to freeze your chicken katsu, it’s best to do so before frying. Prepare the chicken and bread it, then freeze it on a tray. Once frozen, transfer the chicken to a freezer bag. This way, you can fry it fresh later. If already cooked, freeze the chicken alone. Use it within three months for the best taste.
FAQs
What is Chicken Katsu?
Chicken katsu is a Japanese dish. It features breaded and fried chicken. The chicken is often made with thigh meat for juiciness. It is crispy on the outside and tender inside. You serve it with rice and cabbage. Katsu sauce, a sweet and savory sauce, adds great flavor.
Can I make Chicken Katsu gluten-free?
Yes, you can make chicken katsu gluten-free. Use gluten-free flour and panko breadcrumbs. Many brands offer these options. Just check the labels. This way, you can enjoy the same crispy texture without gluten.
How can I ensure my chicken stays juicy?
To keep your chicken juicy, pound it to an even thickness. This helps it cook evenly. Season it well with salt and pepper. Fry it at the right temperature, around 350°F (175°C). Don’t overcook the chicken; about 4-5 minutes per side is best. Let it rest before slicing to lock in the juices.
What are good side dishes for Chicken Katsu Bowls?
Great side dishes include steamed vegetables and miso soup. You can also serve pickled vegetables for a nice crunch. Some like to add edamame or a simple salad. These sides balance the meal and make it more colorful.
In this blog post, we covered all you need to make Chicken Katsu. We explored ingredients, tips, and cooking steps for great results. I shared ways to customize your dish and serve it well, plus storage advice.
Remember, the key to a yummy Chicken Katsu is fresh ingredients and careful frying. Don’t be afraid to try different sauces and sides. Enjoy making this tasty dish, and watch your meal become a favorit