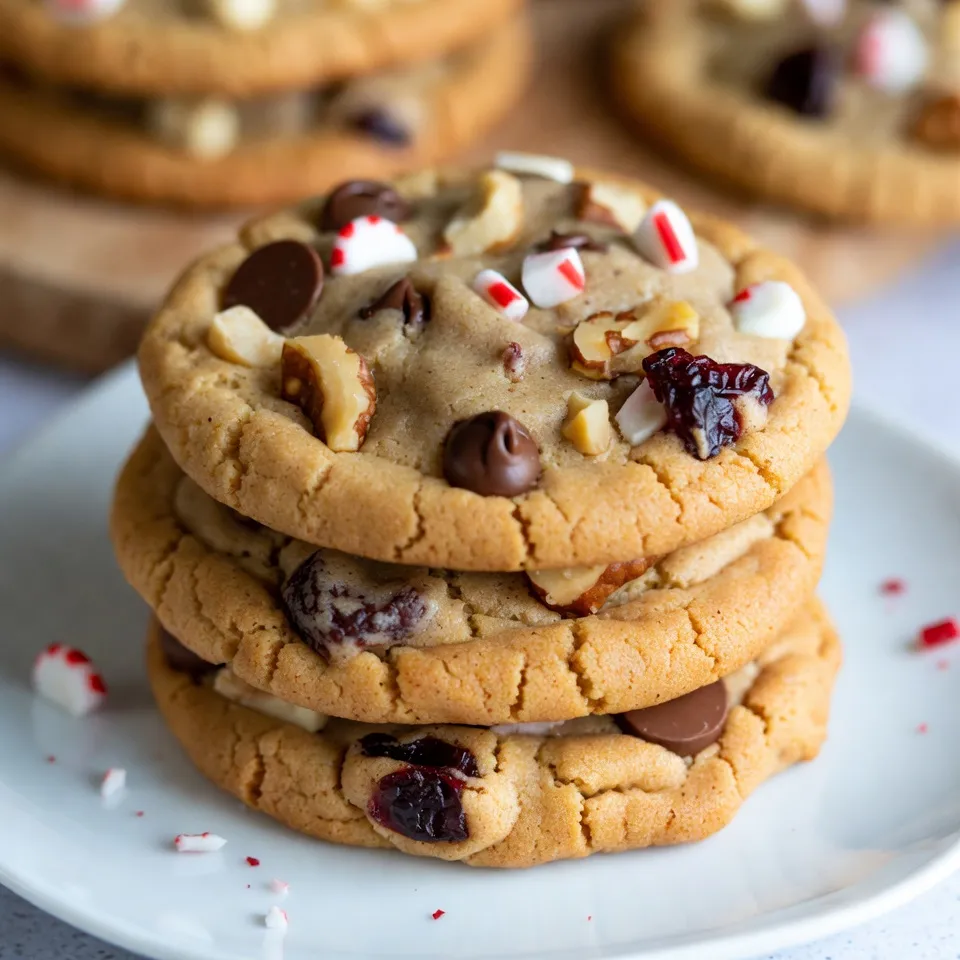
Get ready to bake the most festive treat of the season: Christmas Kitchen Sink Cookies! These cookies combine all your favorite flavors into one delicious bite. Packed with oats, chocolate, peppermint, and nuts, they are perfect for holiday gatherings or cozy nights in. Join me as we explore simple steps to create these delightful bites and tips for making them even better. Your holiday cookie game will never be the same!
Why I Love This Recipe
- Festive Flavor Explosion: These cookies combine the best holiday flavors, from rich chocolate to refreshing peppermint, making every bite a seasonal delight.
- Texture Galore: The mix of oats, nuts, and dried fruit creates a delightful texture, ensuring each cookie is satisfying to munch on.
- Customizable Treats: With the versatility to swap in your favorite mix-ins, these cookies can be tailored to suit any taste preference or dietary need.
- Perfect for Sharing: These cookies make a great gift or party treat, spreading joy and sweetness during the holiday season.
Ingredients
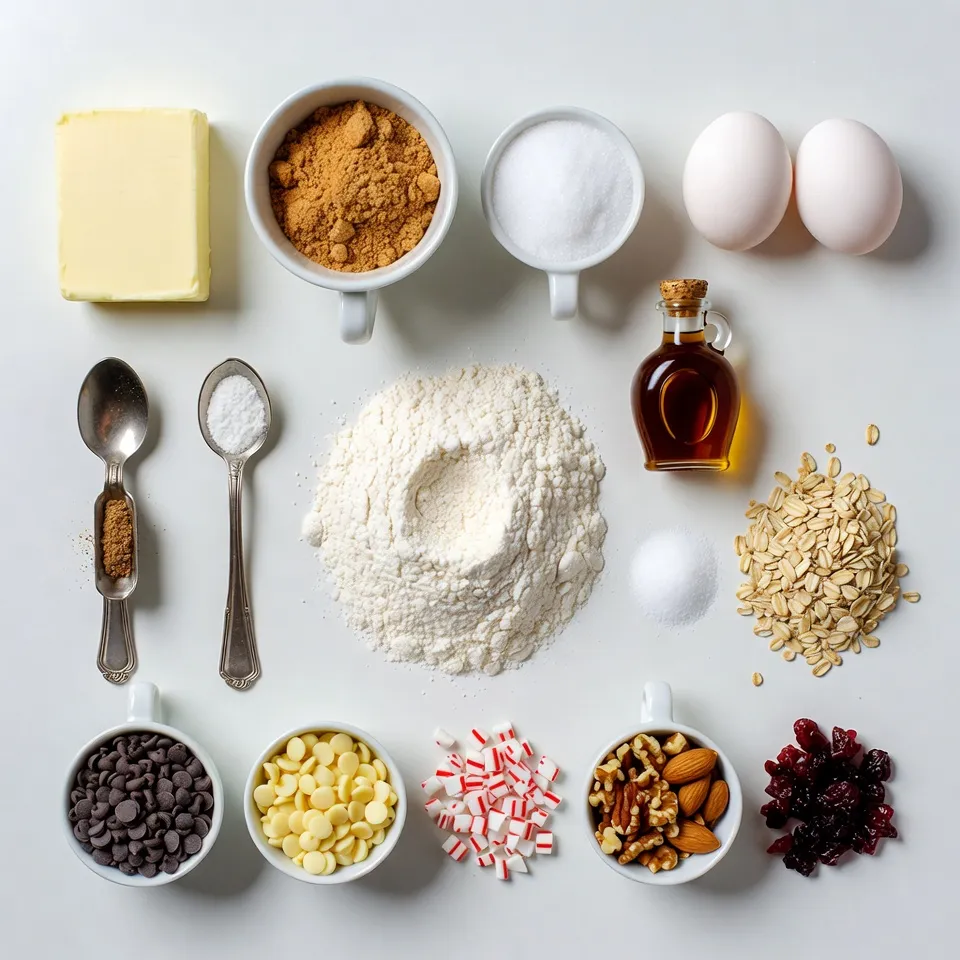
Essential Ingredients
– 1 cup unsalted butter
– 1 cup packed brown sugar
– 1/2 cup granulated sugar
– 2 large eggs
– 2 teaspoons pure vanilla extract
For these Christmas Kitchen Sink Cookies, you need a mix of essential items. Butter is key to making the cookies soft and rich. Use unsalted butter for better control over the saltiness. Brown sugar and granulated sugar add sweetness, while the eggs help bind everything. Vanilla extract gives a warm flavor that makes each bite special.
Dry Ingredients
– 3 cups all-purpose flour
– 1 teaspoon baking soda
– 1/2 teaspoon fine sea salt
Next, gather your dry ingredients. All-purpose flour is the base of the dough. Baking soda helps the cookies rise. Fine sea salt balances the sweetness. Be sure to whisk these together well. This step ensures even mixing and helps avoid clumps.
Fun Add-ins
– 1 cup rolled oats
– 1 cup semi-sweet chocolate chips
– 1/2 cup creamy white chocolate chips
– 1/2 cup crushed peppermint candies
– 1 cup mixed nuts
– 1/2 cup dried cranberries
Now comes the fun part! Add-ins make these cookies unique. Rolled oats give a nice texture. Semi-sweet and white chocolate chips add sweet bursts. Crushed peppermint candies bring a festive crunch. Mixed nuts provide a lovely nutty flavor. Dried cranberries add a hint of tartness. Mix these carefully into your dough. This step is where the magic happens! Each bite will be different and delicious.
Step-by-Step Instructions
Preheat the Oven and Prepare Baking Sheet
– Set the oven to 350°F (175°C).
– Line a baking sheet with parchment paper.
Cream the Butter and Sugars
Start with softened butter. In a large bowl, mix it with brown sugar and granulated sugar. Use an electric mixer on medium speed. Beat it until light and fluffy, about 3-5 minutes.
Add Eggs and Vanilla
Next, crack in the eggs. Add them one at a time, mixing after each. Then stir in the pure vanilla extract. This adds a nice sweetness.
Mix Dry Ingredients
In a separate bowl, whisk together the all-purpose flour, baking soda, and fine sea salt. This step ensures even mixing of the dry ingredients.
Combine Wet and Dry Mixtures
Slowly add the dry mixture to your wet mixture. Stir gently until just combined. Be careful not to overmix. This keeps your cookies tender and soft.
Fold in the Add-ins
Now, it’s time for the fun part! Carefully fold in the rolled oats, semi-sweet chocolate chips, creamy white chocolate chips, crushed peppermint candies, mixed nuts, and dried cranberries. Make sure everything is evenly mixed. This gives the cookies their delightful ‘kitchen sink’ texture.
Shape and Bake
Using a tablespoon or cookie scoop, drop rounded dollops of dough onto your prepared baking sheet. Leave about 2 inches between each mound. This allows them to spread while baking.
Cool and Serve
Bake the cookies in the oven for 10-12 minutes. Once they are lightly golden on the edges and the center is soft, remove them from the oven. Let them cool on the baking sheet for 5 minutes. After that, transfer the cookies to a wire rack to cool completely. This helps them set perfectly!
Tips & Tricks
Baking Tips for Perfect Cookies
To make the best Christmas Kitchen Sink Cookies, avoid overmixing the dough. When you mix the wet and dry ingredients, do it just until combined. This helps keep the cookies soft and chewy. Monitor baking time closely for soft centers. Bake until the edges are lightly golden, but the middle should look slightly underbaked. This will ensure a nice, gooey texture.
Serving Suggestions
These cookies pair well with hot cocoa or a glass of milk. The warm drinks complement the sweetness of the cookies. For an extra festive touch, garnish with crushed peppermint candies on top. This adds color and a delightful crunch.
Varying Your Recipe
Feel free to experiment with different nuts or dried fruits in the mix. You can use walnuts, pecans, or even hazelnuts. For dried fruits, consider using raisins or cherries. Each combination brings a new flavor and keeps things interesting.
Pro Tips
- Chill the Dough: If you have time, refrigerate the cookie dough for about 30 minutes before baking. This helps the flavors meld and results in thicker cookies that hold their shape better.
- Experiment with Mix-Ins: Feel free to customize the mix-ins based on your preferences. Substitute the nuts for your favorite seeds or add in different types of dried fruits for a unique twist!
- Use a Cookie Scoop: For uniform cookies, use a cookie scoop. This ensures even baking and gives your cookies a professional look.
- Check for Doneness: Remember that cookies will continue to cook on the baking sheet after being removed from the oven. Aim for a slightly underbaked center for the ultimate chewy texture.
Variations
Alternative Ingredients
You can switch up the chocolate chips in your cookies. Use butterscotch chips or dark chocolate if you like. For a fun twist, try adding peanut butter chips. If you need a gluten-free option, use almond flour or a gluten-free flour blend. This keeps the cookies soft and tasty.
Seasonal Variations
To make your cookies even more festive, toss in holiday spices. A pinch of cinnamon or nutmeg adds warmth and cheer. You can also add seasonal fruits like diced apples or chopped dates. These will give your cookies a unique twist and burst of flavor.
Cookie Size Options
You can make mini cookies for cute bites. Use a teaspoon to scoop small amounts of dough. Bake them for about 8-10 minutes. If you want larger cookies, use a larger scoop. Just be ready to bake them a bit longer, around 12-15 minutes. Keep an eye on them so they don’t overbake.
Storage Info
How to Store Cookies
To keep your Christmas Kitchen Sink Cookies fresh, use an airtight container. I recommend placing parchment paper between layers of cookies. This keeps them soft and prevents them from sticking. Store your cookies at room temperature for the best taste. They will stay fresh for several days this way.
Freezing Instructions
Freezing your cookies is a great option if you want to save some for later. Start by letting the cookies cool completely. Then, place them in a single layer on a baking sheet. Freeze them for about an hour. After that, transfer the cookies to a freezer-safe bag or container. They can last for up to three months in the freezer. To thaw, remove them from the freezer and let them sit at room temperature for about 30 minutes.
Shelf Life
At room temperature, these cookies last about five to seven days. Keep them stored in an airtight container for the best results. If you notice they are getting hard, a slice of bread in the container can help keep them soft. This is a simple trick to maintain their chewy texture!
FAQs
What are Kitchen Sink Cookies?
Kitchen sink cookies are a fun mix of many ingredients. They include different types of chocolate, nuts, and even dried fruits. You can add anything you like! This cookie style gets its name because you can toss in whatever you have on hand, just like a kitchen sink. The result? A chewy, sweet cookie that has a little bit of everything.
Can I make these cookies ahead of time?
Yes, you can! You can prepare the dough and store it in the fridge for up to three days. Just cover it tightly with plastic wrap. When you’re ready to bake, scoop the dough onto a tray and bake as usual. If you want to make them even earlier, you can freeze the dough for up to three months. Just thaw it in the fridge before baking.
What variations can I try for Kitchen Sink Cookies?
You can get creative with kitchen sink cookies! Here are some ideas:
– Swap semi-sweet chocolate chips for dark chocolate or butterscotch chips.
– Use different nuts like pecans or cashews.
– Try adding dried fruits like raisins or apricots.
– Mix in spices like cinnamon for a warm flavor.
The options are endless, so feel free to experiment with your favorites!
How do I prevent cookies from spreading too much?
To keep your cookies from spreading too much, try these tips:
– Make sure your butter is softened, but not melted.
– Chill the dough for at least 30 minutes before baking.
– Use parchment paper to line your baking sheet.
– Space the cookies at least two inches apart on the tray.
These steps can help the cookies hold their shape while baking.
Are these cookies suitable for gifting?
Absolutely! These cookies make great gifts. To present them nicely, stack them in a festive tin or a decorative box. You can also wrap them in cellophane tied with a ribbon. Add a little note for a personal touch. These treats not only look good but taste great too, making them perfect for sharing during the holidays!
This guide covered every step to make delicious Kitchen Sink Cookies. We reviewed the essential ingredients, drying methods, and fun add-ins you can try. Remember, the best cookies come from mixing creativity with care. Don’t be afraid to switch things up with flavors or sizes. You now have the tips to bake perfect cookies every time. Enjoy sharing your tasty treats with family and friends. Baking is about fun and love. Happy bakin