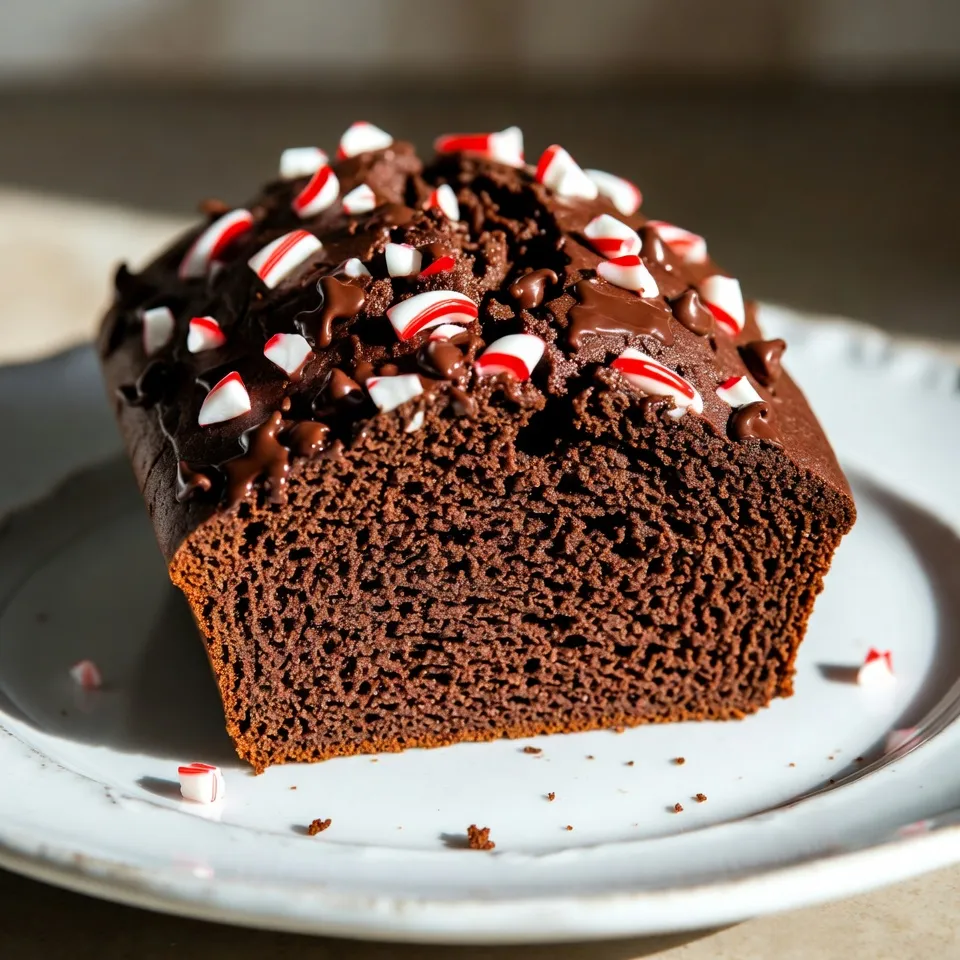
Are you ready to bring a festive twist to your baking? Chocolate Peppermint Bread is a fun, flavorful treat that combines rich chocolate with refreshing peppermint. This easy recipe will fill your kitchen with holiday cheer and delight your taste buds. You only need simple ingredients and a few steps to create this mouthwatering loaf. Let’s get started and make your next gathering truly special!
Why I Love This Recipe
- Festive Flavor Combination: This recipe perfectly combines rich chocolate and refreshing peppermint, creating a delightful holiday treat that is both decadent and festive.
- Easy to Make: With simple ingredients and straightforward steps, this bread is perfect for bakers of all levels, making it an accessible holiday baking option.
- Perfect for Sharing: Yielding 10 slices, this bread is great for gatherings, gift-giving, or simply enjoying with family and friends during the holiday season.
- Customizable Garnish: The crushed candy canes on top add a festive touch and can be easily adjusted or replaced with other toppings to suit your taste.
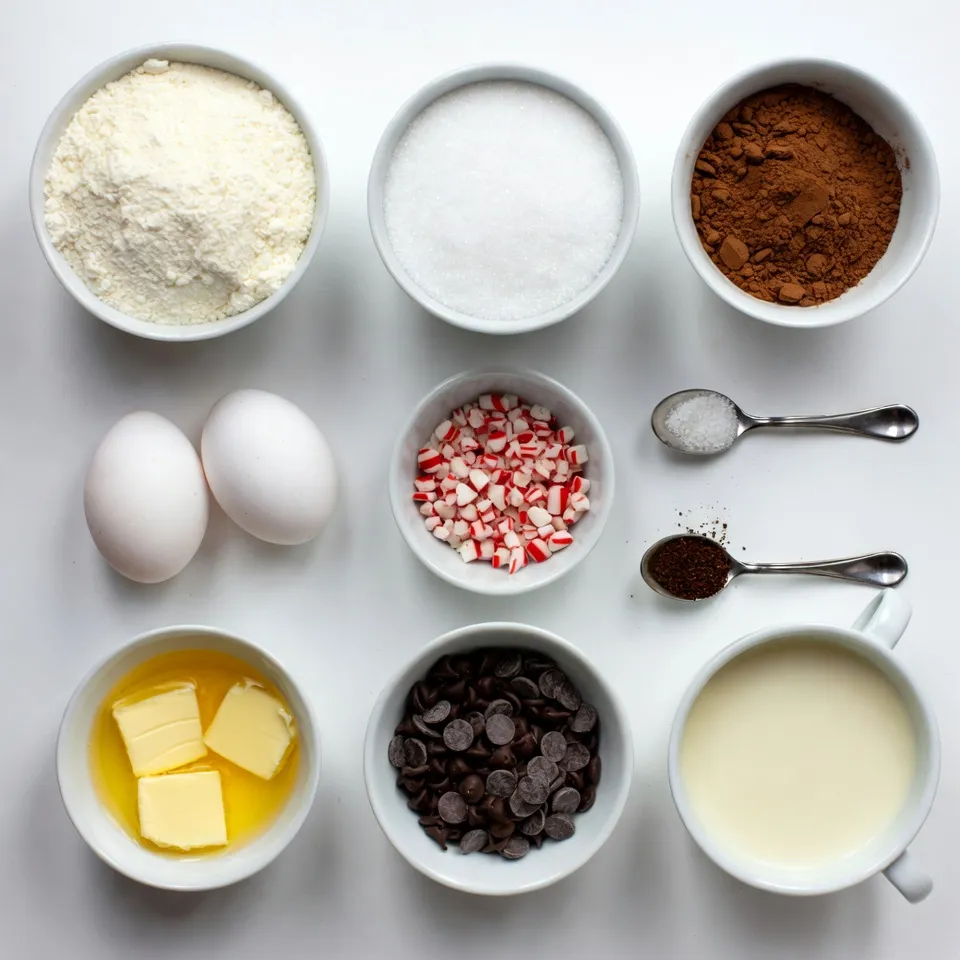
Ingredients
Dry Ingredients
– 2 cups all-purpose flour
– 1 cup granulated sugar
– 1/2 cup unsweetened cocoa powder
– 1 teaspoon baking powder
– 1/2 teaspoon baking soda
– 1/4 teaspoon salt
Wet Ingredients
– 2 large eggs
– 1/2 cup unsalted butter, melted
– 1 cup buttermilk
– 1 teaspoon peppermint extract
Mix-ins and Garnish
– 1 cup semi-sweet chocolate chips
– 1/4 cup crushed candy canes
To start, gather all your dry ingredients. The all-purpose flour gives structure to the bread. Granulated sugar adds sweetness, while unsweetened cocoa powder provides that rich chocolate flavor. Baking powder and baking soda help the bread rise. Salt enhances the taste, balancing the sweetness.
Next, focus on the wet ingredients. Eggs bind everything together and add moisture. Melted unsalted butter adds richness, and buttermilk keeps the bread tender. The peppermint extract gives it that festive taste we all love during the holidays.
Finally, don’t forget the mix-ins. Semi-sweet chocolate chips bring in pockets of gooey chocolate. Crushed candy canes not only add a nice crunch but also a pop of color on top, making it look festive. Each ingredient plays a key role, ensuring your chocolate peppermint bread is both tasty and appealing.
Step-by-Step Instructions
Prepping the Oven and Pan
First, you need to preheat your oven to 350°F (175°C). This step is key for even baking. Next, prepare a 9×5-inch loaf pan. You can grease it with butter or oil. Alternatively, line it with parchment paper. This will make it easy to remove the bread later.
Mixing Dry Ingredients
In a large bowl, combine the dry ingredients. Use 2 cups of all-purpose flour, 1 cup of granulated sugar, 1/2 cup of unsweetened cocoa powder, 1 teaspoon of baking powder, 1/2 teaspoon of baking soda, and 1/4 teaspoon of salt. Whisk them together well. Make sure there are no lumps. A good mix ensures the bread will rise nicely.
Preparing the Wet Ingredients
In a separate bowl, crack 2 large eggs. Beat them until they look frothy. Then, add 1/2 cup of melted unsalted butter, 1 cup of buttermilk, and 1 teaspoon of peppermint extract. Stir until everything blends smoothly. These wet ingredients give the bread its rich flavor.
Combining Wet and Dry Ingredients
Carefully pour the wet mixture into the dry ingredients. Use a spatula or wooden spoon to mix them gently. You want to combine them just until they are mixed. Avoid overworking the batter. This keeps the bread light and fluffy.
Adding Chocolate Chips
Now, it’s time for the chocolate chips! Take 1 cup of semi-sweet chocolate chips and gently fold them into the batter. Make sure they are evenly spread throughout. This will give you chocolatey goodness in every bite.
Baking the Bread
Transfer the batter to your prepared loaf pan. Smooth the top with the back of a spatula. Place the loaf pan in your preheated oven. Bake for 50-60 minutes. To check if it is done, insert a toothpick in the center. It should come out clean when the bread is ready.
Cooling the Bread
After baking, remove the bread from the oven. Let it cool in the pan for about 10 minutes. Once it cools slightly, carefully turn it out onto a wire rack. This helps the bread cool completely. After it cools, you can sprinkle crushed candy canes on top for a festive touch. Enjoy slicing this treat!
Tips & Tricks
Achieving the Perfect Texture
To make great Chocolate Peppermint Bread, mixing matters. Start by whisking your dry ingredients well. This step helps blend the flour and cocoa. It prevents lumps that can affect texture. When you add wet ingredients, mix just until combined. Overmixing can lead to a dense loaf, so be gentle.
Flavor Enhancements
Want a richer taste? Add a teaspoon of vanilla extract. This small change makes a big difference. You can also try different types of chocolate. Dark chocolate will add depth, while milk chocolate gives a sweet touch. Experiment with what you like best.
Presentation Tips
Serve your festive bread on a pretty platter. It makes a great centerpiece for the holiday table. For a special touch, drizzle melted chocolate on top. This adds shine and richness. Don’t forget to sprinkle crushed candy canes for color and crunch. It makes the bread look as good as it tastes!
Pro Tips
- Use Room Temperature Ingredients: Allow your eggs and buttermilk to sit out for about 30 minutes before mixing. This helps create a smoother batter and ensures better blending.
- Don’t Overmix the Batter: Mix the wet and dry ingredients until just combined. Overmixing can lead to a denser loaf, so be gentle when folding in the chocolate chips.
- Check for Doneness Early: Start checking your bread at the 50-minute mark. Ovens can vary, and you want to avoid overbaking to keep the bread moist and tender.
- Enhance the Peppermint Flavor: For a stronger peppermint taste, you can increase the peppermint extract slightly, but be cautious not to overpower the chocolate flavor.
Variations
Gluten-Free Option
If you want a gluten-free version of chocolate peppermint bread, you can swap all-purpose flour. Use 2 cups of gluten-free all-purpose flour blend instead. Make sure it has xanthan gum, as it helps bind the ingredients. This will create a similar texture without gluten.
Vegan Adaptation
To make this recipe vegan, you can replace the eggs. Use 1/4 cup of applesauce or 1/4 cup of mashed banana for each egg. For the butter, use a plant-based alternative like coconut oil or vegan butter. For buttermilk, mix 1 cup of almond milk with a tablespoon of vinegar or lemon juice. This will help you keep the bread moist and flavorful.
Flavor Variations
You can add spices for a warm twist. Consider mixing in a teaspoon of cinnamon or nutmeg to the dry ingredients. This will give your bread a cozy flavor. If you like crunch, try adding 1/2 cup of chopped nuts like walnuts or pecans. You can also mix in flavored chips, such as white chocolate or dark chocolate, for a fun change.
Storage Info
Short-term Storage
To keep your chocolate peppermint bread fresh, store it at room temperature. Place it in an airtight container or wrap it tightly in plastic wrap. This helps to keep it moist and tasty for up to three days. If you slice it, use a serrated knife for clean cuts. This way, each slice stays soft and delicious.
Long-term Storage
If you want to save your bread for later, freezing is a great option. Wrap the loaf tightly in plastic wrap, then in aluminum foil. This double wrap helps prevent freezer burn. You can also slice the bread before freezing. This makes it easy to grab a slice when you’re craving it. The bread can last up to three months in the freezer. Just remember to label it with the date!
How to Refresh Stale Bread
If your bread goes stale, don’t worry! You can bring it back to life easily. Preheat your oven to 350°F (175°C). Wrap the stale bread in aluminum foil to keep it moist. Bake it for about 10-15 minutes. This will warm it up and make it soft again. You can also toast slices in a toaster or under the broiler for a crispy texture. Enjoy your revived chocolate peppermint bread!
FAQs
Can I use different types of flour?
Yes, you can use other flours. Here are some substitutes:
– Whole wheat flour: This adds fiber and a nutty taste.
– Almond flour: This makes the bread moist and adds a unique flavor.
– Oat flour: This provides a light texture and is gluten-free.
When using these flours, you may need to adjust liquid amounts.
How do I ensure my bread is moist?
To keep your bread moist, follow these tips:
– Use buttermilk: This adds richness and moisture.
– Don’t overbake: Check the bread at the 50-minute mark.
– Cover while cooling: This helps retain moisture after baking.
These steps will help you achieve a soft, delicious loaf.
What can I do if my bread is too dense?
If your bread turns out dense, consider these tips:
– Check your measurements: Ensure you use the right amounts of flour and sugar.
– Avoid overmixing: Stir just until combined to keep the bread light.
– Make sure your baking powder is fresh: Old leavening agents can cause density.
These fixes can help you make a lighter loaf next time.
Can I make mini loaves instead?
Yes, you can make mini loaves! Here’s how:
– Use smaller pans: A standard mini loaf pan works well.
– Adjust baking time: Bake for about 25-30 minutes.
– Check for doneness: Use a toothpick to test if they are done.
These mini loaves are perfect for gifts or sharing with friends!
This blog post walks you through making a delicious bread. We covered dry and wet ingredients, plus mix-ins like chocolate chips and candy canes. You learned how to prep your oven, mix everything right, and bake to perfection. I shared tips for great texture and storage options. You can try gluten-free and vegan versions too. Enjoy your baking and feel free to get creative with flavors. Cooking is fun, and this recipe is a great star
<!-- /wp:post-conte