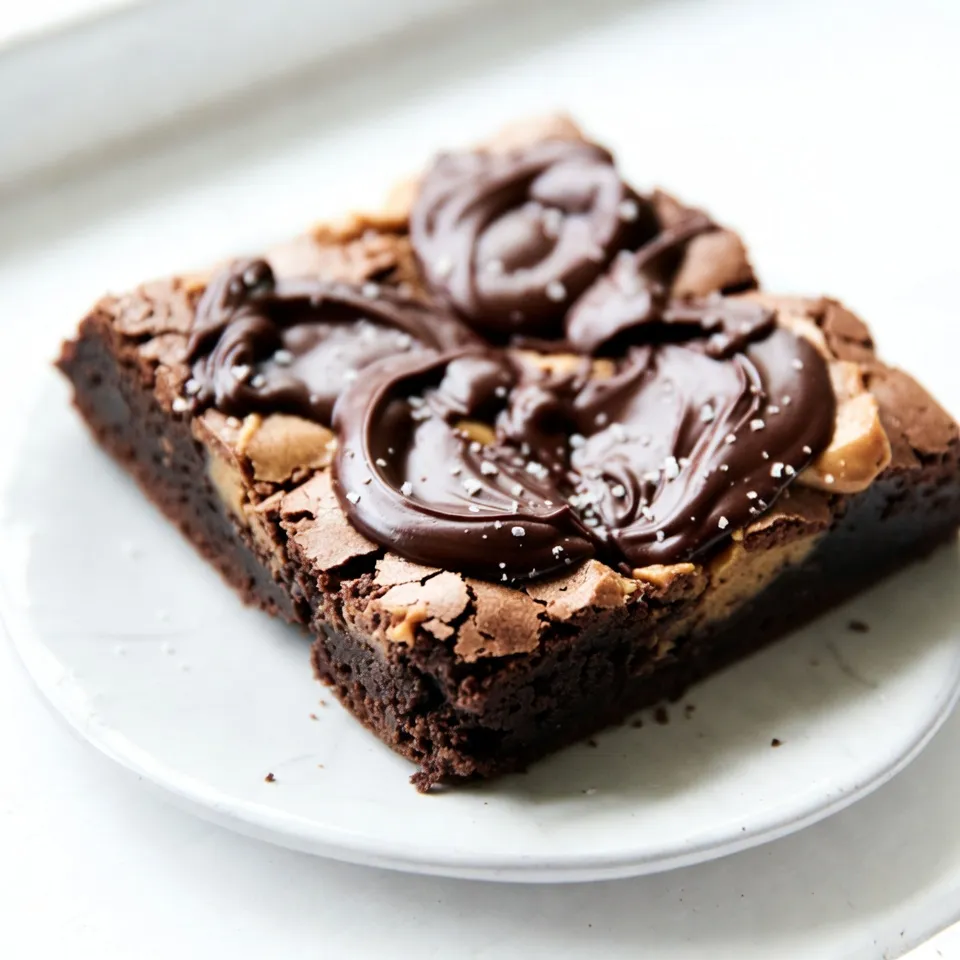
Are you ready to indulge in a treat that combines peanut butter and chocolate bliss? Buckeye brownies are the perfect dessert to satisfy your sweet tooth. With a rich, chocolatey base and a creamy peanut butter layer, these brownies are a fan favorite. In this guide, I’ll walk you through the simple steps to create this delightful concoction from scratch. Let’s dive into the world of Buckeye brownies and make dessert unforgettable!
Why I Love This Recipe
- Decadent Flavor: This brownie recipe combines rich chocolate with a creamy peanut butter layer, creating an irresistible treat that satisfies every sweet tooth.
- Easy to Make: With simple steps and common ingredients, these brownies come together quickly, making them perfect for any baking novice or last-minute dessert craving.
- Perfect for Sharing: Yielding 24 generous squares, these brownies are ideal for gatherings, parties, or just sharing with family and friends.
- Customizable Toppings: You can easily adapt the toppings by adding nuts, sprinkles, or even a drizzle of caramel, allowing for a personalized touch each time you bake.
Ingredients
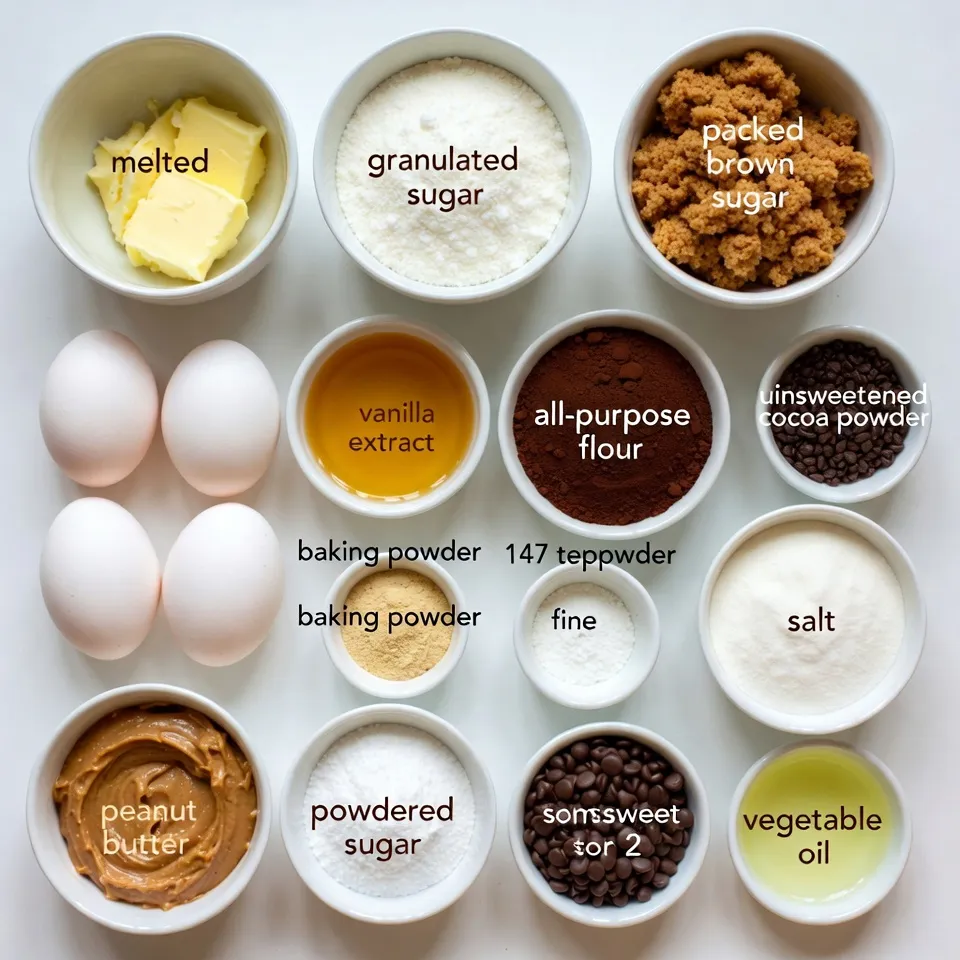
List of Ingredients
– 1 cup unsalted butter, melted
– 1 cup granulated sugar
– 1 cup packed brown sugar
– 4 large eggs
– 1 tablespoon pure vanilla extract
– 1 cup all-purpose flour
– 1 cup unsweetened cocoa powder
– 1/2 teaspoon baking powder
– 1/2 teaspoon salt
– 1 cup creamy peanut butter
– 1 cup powdered sugar
– 1 cup semi-sweet chocolate chips
– 2 tablespoons vegetable oil
To make Buckeye Brownies, you need simple, fresh ingredients. The butter gives the brownies their rich taste. The sugars sweeten and add depth. Eggs provide structure, while vanilla enhances flavor.
Flour and cocoa create a soft, chocolatey base. Baking powder helps the brownies rise. Salt balances the sweetness. The peanut butter layer adds creaminess and a nutty flavor. Lastly, chocolate chips melt into a smooth topping, making each bite a treat.
Equipment Needed
– 9×13 inch baking pan
– Mixing bowls
– Whisk and spatula
– Microwave-safe bowl
You will need a few tools to make these brownies. A 9×13 inch baking pan is perfect for baking. Mixing bowls help you combine ingredients easily. A whisk and spatula make mixing fun and easy. A microwave-safe bowl is a must for melting chocolate.
Gather these items before you start. This way, you can cook without any delays. Enjoy the process and the delicious results!
Step-by-Step Instructions
Preheating and Preparing
– Preheat oven to 350°F (175°C).
– Prepare the baking pan with grease or parchment paper.
First, we need to set the oven to 350°F. This is the right heat for baking the brownies. While the oven warms up, let’s get our baking pan ready. Grease the pan well or use parchment paper. This will help us take the brownies out easily later.
Making the Brownie Base
– Combine melted butter, sugars, eggs, and vanilla.
– Mix in dry ingredients until combined.
In a large bowl, pour in the melted butter. Next, add the granulated sugar and brown sugar. Whisk these together until smooth. Now, crack in four large eggs, mixing well after each one. Add one tablespoon of pure vanilla extract and stir until combined. In another bowl, mix the flour, cocoa powder, baking powder, and salt. Slowly add this dry mix to the wet mix. Stir gently until just mixed. Be careful not to overmix, or the brownies will be tough.
Baking and Cooling
– Pour batter into the pan and bake for 25-30 minutes.
– Test for doneness and allow to cool completely.
Now let’s pour the brownie batter into the prepared pan. Spread it out evenly with a spatula. Bake in the oven for 25 to 30 minutes. To check if they are done, insert a toothpick into the center. It should come out with a few moist crumbs. Once baked, let the brownies cool completely in the pan.
Preparing Layers
– Blend peanut butter and powdered sugar.
– Microwave chocolate chips and vegetable oil until melted.
While the brownies cool, we can make the peanut butter layer. In a medium bowl, blend one cup of creamy peanut butter with one cup of powdered sugar. Mix until smooth and creamy. Next, take a microwave-safe bowl and add one cup of chocolate chips with two tablespoons of vegetable oil. Microwave this mixture in 30-second bursts, stirring in between. Keep going until it is fully melted and silky.
Assembly of Buckeye Brownies
– Spread peanut butter mixture over the cooled brownies.
– Pour melted chocolate on top and spread evenly.
Once the brownies are cool, spread the peanut butter mixture over them evenly. Now, pour the melted chocolate over the peanut butter layer. Use a spatula to spread it out evenly. This creates a delicious layer on top. Now, we can refrigerate the brownies for about 30 minutes. This will help the chocolate set nicely.
Tips & Tricks
How to Achieve the Best Texture
– Avoid overmixing the brownie batter. This keeps them soft and fudgy.
– Check doneness with a toothpick. It should come out with a few moist crumbs.
When making Buckeye Brownies, the right texture is key. Mix the wet and dry ingredients until just combined. Overmixing can lead to dry brownies.
Presentation Ideas
– Garnish with flaky sea salt or crushed peanuts. This adds a nice crunch.
– Serve on a decorative platter. It makes your dessert look even more inviting.
Presentation matters. A sprinkle of sea salt enhances the flavor. A pretty platter makes your brownies stand out at any gathering.
Common Mistakes to Avoid
– Not letting brownies cool completely before adding layers. This can cause a messy mix.
– Using cold ingredients for the peanut butter layer. Room temperature is best for smooth spreading.
Cooling is crucial. If the brownies are warm, the peanut butter layer can slide off. Make sure your peanut butter is at room temp for easy mixing.
Pro Tips
- Use Room Temperature Ingredients: Bringing ingredients like eggs and peanut butter to room temperature helps them combine more easily, resulting in a smoother batter.
- Don’t Overmix the Batter: Mixing just until combined will keep your brownies fudgy and prevent them from becoming tough.
- Chill for Firmness: Chilling the brownies in the refrigerator after adding the chocolate topping will help set it quickly and make cutting easier.
- Experiment with Mix-ins: For added flavor and texture, consider mixing in chopped nuts or chocolate chunks into the brownie batter before baking.
Variations
Adding Flavors
You can change up the flavor of your Buckeye Brownies easily. Adding espresso powder gives a nice mocha twist. Just one teaspoon will do the trick. If you prefer a crunch, try substituting crunchy peanut butter for the creamy kind. This adds a fun texture and extra peanut taste.
Dietary Adjustments
Want to make your brownies fit special diets? You can make them gluten-free by using gluten-free flour. This swap keeps them tasty for everyone. For a vegan option, simply use dairy-free chocolate chips. They melt well and taste great, keeping your brownies rich and smooth.
Incorporating Mix-ins
Mix-ins can add a special touch. You can add nuts or chocolate chunks directly into the brownie batter for extra flavor. If you want something fruity, try swirling in raspberry or caramel sauce into the batter before baking. This turns your brownies into a delightful treat with surprises in every bite!
Storage Info
Best Storage Practices
To keep your Buckeye brownies fresh, store them in an airtight container at room temperature. This helps keep the brownies soft and moist. If you want them to last longer, refrigerate them. The cool temperature helps maintain their taste and texture. Just make sure to seal them well to avoid drying out.
Freezing Instructions
You can freeze brownies for longer storage. First, cut them into squares and wrap each piece tightly in plastic wrap. Place the wrapped brownies in a freezer bag or container. This keeps them fresh for up to three months.
When you’re ready to enjoy them, take them out and thaw them in the fridge overnight. You can serve them cold or warm them in the microwave for a few seconds. Enjoy that rich chocolate and creamy peanut butter flavor!
FAQs
What are Buckeye Brownies?
Buckeye brownies blend two treats: brownies and Buckeye candies. Buckeye candies have a creamy peanut butter center, covered in chocolate. Buckeye brownies take this idea and mix it into a rich brownie base. The result is a dessert that is both chewy and creamy. You get the best of both worlds with chocolate and peanut butter.
Can I make Buckeye Brownies ahead of time?
Yes, you can make Buckeye brownies a day in advance. Prepare the brownies and let them cool completely. Then, add the peanut butter and chocolate layers. Cover the pan with plastic wrap and store it in the fridge. This allows the flavors to blend. Plus, it makes dessert prep quick for your event.
How do I fix overbaked brownies?
If your brownies are dry, try adding moisture back. One way is to brush them lightly with warm milk. Alternatively, you can serve them with ice cream or whipped cream. These toppings add creaminess and balance the dryness. Next time, check for doneness earlier. A toothpick should have some moist crumbs when ready.
Can I use cocoa powder instead of chocolate bars for the topping?
You can use cocoa powder, but the taste will change. For the topping, melted chocolate chips give a rich flavor. If you use cocoa powder, mix it with a bit of butter. This will help mimic the texture. However, I recommend sticking with chocolate chips for the best results.
You’ve learned how to make delicious Buckeye Brownies from basic ingredients. The steps are simple, from mixing the batter to layering the toppings. Remember, let your brownies cool fully before adding the peanut butter and chocolate layers. This will help you avoid common mistakes. You can also experiment with fun flavors and ingredients. Proper storage keeps them fresh, and freezing makes them last longer. Enjoy creating these tasty treat